In Review: Blackmagic Design Micro Studio Camera 4K
Posted on Wednesday, October 12, 2016

By Mark J. Foley, Technology Editor, ProductionHUB
When I got the delivery of the Blackmagic Design Micro Studio Camera 4K, I was instantly very curious. I am thinking to myself, OK, a small 4K camera, not exactly a brand new idea. So how would it stack up? What would the image quality be? There are other cameras in the small 4K space that make really nice images, so what would set the Blackmagic Design 4K Micro apart from the rest? Get ready for an interesting twist on how Blackmagic delivered with really solid, exceptional picture quality.
The Warm Up
For starters this version of the Blackmagic Design Micro is designed for live 4K productions. Yes, live, as in taking shots that you end up putting through a switcher (or vision mixer as my old friends across the pond call it) and broadcasting live right then and there out to the world. I think that's great, but truth be told, I'm biased. Having started out in live sports trucks and live studio shoots, (back in the day) I would have loved to use the Micro 4K. The Micro body (minus lens) weighs in at a scant 10.7 ounces, thus making it a very logical choice for mounting in fixed locations up on the studio grid, at a variety of sports, corporate production studios, concerts, entertainment or theme park venues, or even houses of worship. So with those thoughts out of the way, lets get down to brass tacks.
Just the Facts
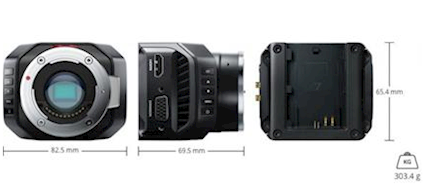
Blackmagic started out right with the magnesium alloy camera body. I am saying that because for anyone who is going to plunk down $1300 bucks they want a camera that is going to last a lot longer than a couple of shoots. The body dimensions come in at a very respectful 3.25 x 2.74 x 2.57 (8.26 x 6.96 x 6.53 cm) or, if you want to visualize the size of the body, the Micro 4K will fit in the palm of your hand. OK, a bigger hand. It has some nice, smart features that came into play as I worked through the camera in production. These features make the difference in the studio space and into the live sports arena. Features such as talkback, tally, mounting points in 1 x 1/4-20 thread (top) or 3 x 1/4&- 20 thread (bottom), built in stereo microphone, and also built in DaVinci color correct and remote camera control via a very unique tether. (More on that shortly) Also, as an additional physical feature, the camera includes a 12V to 30V DC power input so you can power the camera using a standard power supply, such as the AC power adapter included with the camera. The Micro 4K can also use a Canon LP-E6 type battery.
More to Like
The Micro features the same Ultra HD image sensor found in the larger Blackmagic Studio Camera 4K, supporting 3840 x 2160p video up to 30 fps and 1080p video up to 60 fps. The camera is also equipped with an active MFT mount that can accept native MFT or other lenses. The lens can be remotely controlled using the return SDI program feed from your ATEM switcher or from the expansion port on the camera.
Quick Look Spec Check
Sensor Size
13.056mm x 7.344mm
Shooting Resolutions
3840 x 2160, 1920 x 1080
Frame Rates
HD 1080p23.98, 24, 25, 29.97, 30, 50, 59.97, 60, 1080i50, 59.94,
Ultra HD 2160p23.98, 24, 25, 29.97, 30
Connections
SDI Video Output 1 x 6G-SDI 10-bit 4:2:2 via DIN 1.0/2.3 connector
SDI Video Input1 x 6G-SDI 10-bit 4:2:2 via DIN 1.0/2.3 connector
SDI Audio Output 2 channel embedded audio support in SDI stream
HDMI Video Output 1 x HDMI Type A output. HDMI output is always in HD 1080p
HDMI Audio Output 2 channels 48 kHz and 24-bit
Adjusting Your Micro 4K Settings
As far as the physical nature of the Micro 4K, putting the camera setting controls on the front of the camera might have been one of the smartest, most slick moves by Blackmagic. It might sound strange, but I really like the tactile nature of the button controls. Even as small as the buttons seemed, they had a good firm response and once I figured out the menus and adjustments, changing the settings on the Micro 4K was a piece of cake.

The built-in row of buttons along the front of the camera gave me access to power, menu navigation, and settings. Also, I liked how I could just plug an HDMI into the Blackmagic Video Assist, (that's my next review) which allows you to see the camera's menus and settings. The Blackmagic Micro Studio Camera 4K also works with standard SDI camera control protocols, which means that you can then connect the program feed from any model of ATEM switcher to the camera's SDI input and remotely control any setting in the camera, color correct, or even change focus, iris, and zoom on supported lenses.

The Micro 4K Secret Weapon? (Hint: The breakout cable)
Call me crazy as a fox but I thought the tether was one of the best things to include when you buy the Micro 4K. Blackmagic Design calls it a breakout cable, I call it the technically incorrect tether. Yes, if you are a soldering wiz you can make your own, but do you have time, and more importantly are you any good at it? The camera does feature an expansion port that offers multiple control connections. But it is the breakout cable that makes the difference.

It (breakout cable) offers connections such as a PTZ serial output for use with motorized heads and B4 data link output for controlling broadcast lenses. It also includes DC power input, LANC control, and genlock reference input. Additional connectors found on the camera body itself include an HDMI monitor output and 3.5mm audio input. Everything is labeled, which could really help save time, wear and tear.
If I was mounting this to a grid I would secure the Micro 4K, attach the breakout cable, then tie wrap (zip wrap) the crap out of everything, thus taking the weight off the connections and securing the cable(s). The breakout cable might (I said might) be the best thing that comes along with the Micro.
Conclusion(s)
Blackmagic Design has done a great job bringing a lot of really thoughtful design and execution into the Micro 4K. Using that big fat 13.056 x 7.344 mm sensor, the Micro 4K, makes for some very pretty pictures and (wait for it) at a reasonable price point.
Teaming it up with the Video Assist 4K makes a lot of sense too if you have to double down and use the Video Assist to set the Micro 4K up or even record to the Video Assist, in addition to a switcher feed. The fact that you are flying the Micro 4K through a production switcher makes for a much bigger bang for the buck.
Oh, and if you don’t live on solder pond, the breakout cable? Absolutely a no brainer. There are a ton of productions out there that need this type of out-of-the-box, super looking 4K camera that is quick, easy and doesn’t take a degree in rocket science to set up. It is a sturdy little package that would be very a smart consideration as a very capable addition to multiple camera shoots without breaking the bank.
About Mark J. Foley

Mark J. Foley MBA, BA is an award winning Producer/Director and Technology Editor for our very own industry leading website ProductionHUB. His work includes live studio and remote productions throughout the United States. Currently Mark is in production on his documentary the Herreshoff Legacy Project and also figuring out where a good warm weather location will be to shoot in February of 2017.